On August 25, 2017, Hurricane Harvey touched ground in a rural area of southeast Texas. Over the next four days, parts of Texas received over 40 inches of rain, causing unprecedented flooding and displacing over 30,000 people. Volunteer assistance was needed–and fast. Many volunteer efforts seemed to spring up overnight, with churches, corporations, other organizations, and individuals stepping up to help. One such effort was by Volunteer Houston, who mobilized its Disaster Response Module (DRM) in Get Connected to register and manage disaster volunteers.
As I write this, a much bigger hurricane–Hurricane Irma–is bearing down on Florida. Predicted to be even more catastrophic than Harvey, Irma will require untold numbers of volunteers help with response and recovery. As with any hurricane, Irma’s path is unpredictable, and we don’t yet know what communities will experience flooding or where volunteers will be needed.
If your organization serves a community that may be facing disaster, your Connect site may soon face a significant increase in both needs and volunteers. Your site may experience higher traffic, as Volunteer Houston did, and that can be overwhelming, so it’s important to be prepared. Even if you don’t have the DRM, your Connect site can still be an effective tool in managing and mobilizing volunteers. This article offers ideas and best practices for effectively managing disaster-response volunteer opportunities by using tools outside of the DRM—tools that are available to all Connect site clients.
Before the Disaster: Find Out Who Wants to Volunteer
Did you know that your volunteers can update their profiles to say that they’d like to be contacted in case of a disaster? You can also ask new volunteers to provide this information as well. Here are some ways to learn who wants to be notified of volunteer opportunities during a disaster:
- Send an email blast to your volunteers and give them instructions for editing their profiles. (The Contact me in the event of a disaster setting can be found under Settings in the Edit Profile area.)
- To capture this information from new volunteers, update the user-registration form. Go to your site manager panel and click Settings > User Registration. From there, you can click to enable the Contact if Disaster? registration item.
- Keep in mind that you can add custom questions to the user-registration form. Custom questions are useful if you want to know volunteers’ emergency contact information, blood type, skills, past disaster-response experience, etc.
- Because any custom questions you add will show up in all volunteers’ profiles, your existing volunteers can update their information as well.
Later on, you can send disaster-response email blasts to only those volunteers who have indicated that they’d like to be contacted, or who meet certain custo1 criteria. See “Contact Your Volunteers” below for more information.
Set Up an Initiative
To ensure that your disaster-response needs are both easy to find and easily recognizable as disaster response needs, you’ll want to begin by setting up an initiative for disaster response. Here are some things to keep in mind as you set up the initiative:
- The Initiative Banner: Title and Description. Each need within the initiative will be displayed with a banner, which will include the initiative title and description. Your title should be clear and communicative: “Disaster Response Needs” is a good generic title, or you may want to name the disaster (for example, “Disaster Response: Hurricane Irma”) so that volunteers know exactly where their efforts will be focused. In your description, include any useful links, warnings, and other important information.
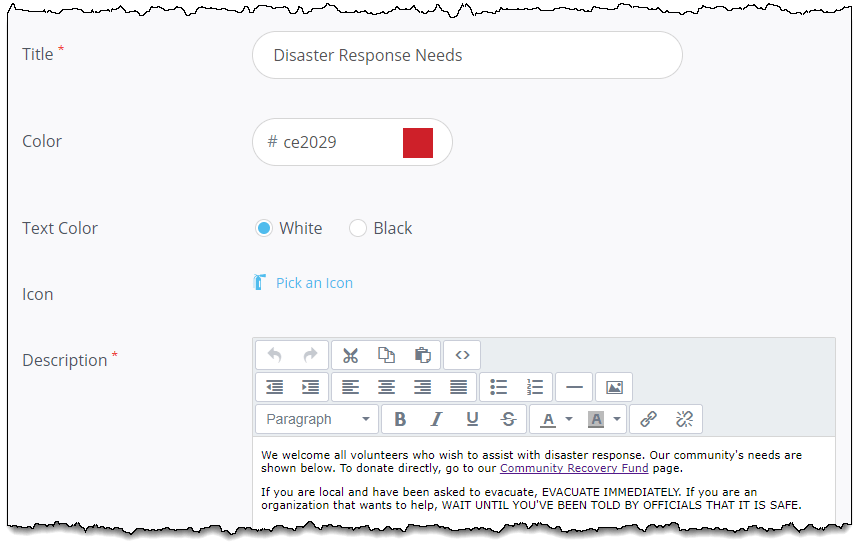
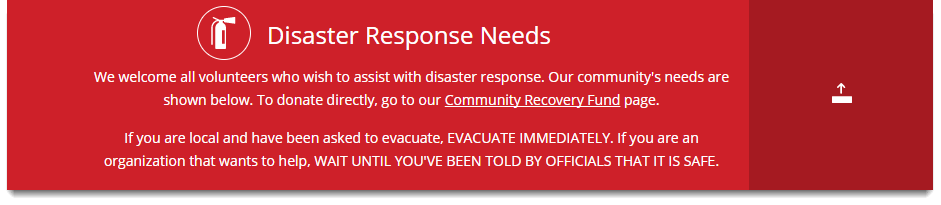
Read on to see what this banner looks like in the volunteer view. - The Initiative Banner: Color and Icon. In addition to communicating with words, use the banner’s color and icon to clarify that these are disaster response needs. This might include using a bright shade of red (such as hex code #ce2029) to indicate emergency/disaster needs, and an icon that indicates the same. Your Connect site has several options, such as the attention, megaphone, heart, and fire extinguisher icons, that can be used for this purpose. In this example, we’ve used the suggested hex code with the fire-extinguisher icon:
- Customized Notifications. Remember to add disaster-specific information to your confirmation messages. This is particularly important if you want to provide links for further information or a way to get updates on the response efforts.
- Custom Questions for Disaster Response. Once you’ve submitted the initiative, you’ll get the option to add custom questions for that specific initiative. You can add an unlimited number of questions. Here are a few you may want to include:
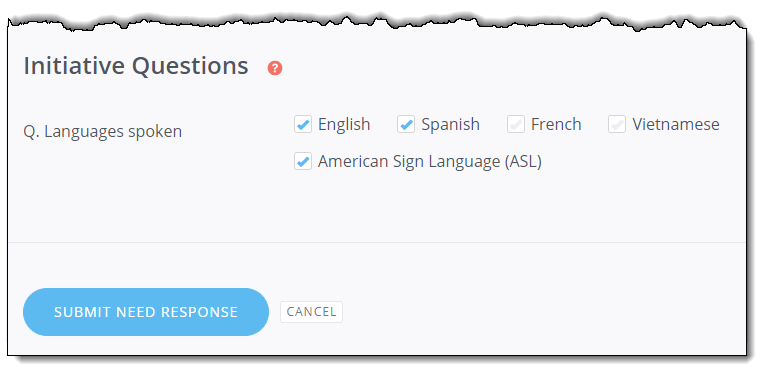
- Special skills, services, and tools. Are you in need of volunteers who speak Spanish? Who have access to certain tools or types of vehicles? Who are certified in a particular trade? You can create a custom question asking volunteers to provide information about the skills and services they offer. When a volunteer responds to a disaster-response need, they’ll be shown any custom questions as part of their response form. In this example, the site manager has created a checklist to learn what languages a volunteer can speak.
- Mobile phone numbers. Not everyone includes their mobile phone numbers in their user profiles. If you want to be able to reach a volunteer by phone (or text), include a custom question for a phone number where they can be reached during this response. (Note: If collected as an initiative question, mobile phone number will be attached to the user’s response, not to the user’s profile. To store the phone number with the user’s profile, ask them to update this information there, rather than as part of their response to a need.)
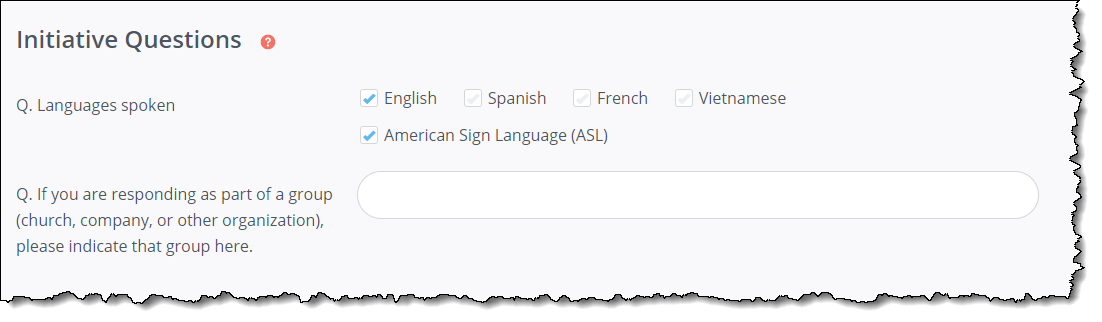
- Group represented. Chances are, you’ll see new groups of volunteers in response to the disaster. Since you may not already have user groups set up for these volunteers, consider adding an open-ended question for people to inform you of what group (if any) they are volunteering with. This information will be useful in reporting later on.
 Blood type. If you will be looking for blood donors, this information could be important! Later you can send out an email blast to volunteers who have indicated that they have a certain blood type. (Note: As with mobile phone numbers, you may want to add this item to the user profile rather than as an initiative question.)
- Travel, transportation, and lodging. Do you need to know if a volunteer is traveling to your community from out of state? If they’ll need lodging of any kind? You can later run a filter on these volunteers to determine what, if anything, will be required to meet their needs.
- Disaster-response training or experience. It may be helpful to know how skilled your volunteers are in responding to a disaster. If you ask this question, consider making it a text field so that volunteers can provide brief details on their past experience or training.
- Special skills, services, and tools. Are you in need of volunteers who speak Spanish? Who have access to certain tools or types of vehicles? Who are certified in a particular trade? You can create a custom question asking volunteers to provide information about the skills and services they offer. When a volunteer responds to a disaster-response need, they’ll be shown any custom questions as part of their response form. In this example, the site manager has created a checklist to learn what languages a volunteer can speak.
Set Up a Spotlight
You want your disaster needs to be easy to find, so go ahead and set up a spotlight and link it to your disaster-response initiative. Even if you aren’t yet ready to begin posting needs, it’s good to prepare a spotlight in advance. Keep the spotlight inactive until you’re ready for people to begin responding to the initiative’s needs. Here are a few tips for setting up your disaster-response spotlight:
- Use the same color, icon, and title for the spotlight banner that you used for the initiative.
- Move the spotlight to the “Spotlight 1” position. Keep it inactive until you’re ready to begin linking to disaster-response needs.
- Remember to enable the Show in Navigation option so that volunteers can access the initiative page from both the spotlight banner and your navigation menu.
Once the time for disaster-response is over, simply deactivate the spotlight.
Contact Your Agencies
Let your agencies know that they can continue to use your Connect site to post volunteer opportunities. Here are some steps you may want to take in order to manage agency-posted disaster-response needs effectively:
- In your site settings, you can give agencies permission to tie their posted needs to any initiative. You may want to turn this setting on or off, depending on the level of control you want to have over what is or is not included in the initiative. To access this setting, go to Settings > Main Settings and scroll down to the Needs area.
- You may want to change your site’s settings for approving new needs. If you don’t normally auto-approve, you may want to begin auto-approving so that the needs can get posted ASAP. On the other hand, you may want to manually approve all new needs coming in to ensure that they are a good fit for your site, and for your volunteers. While different organizations’ situations vary, we recommend reviewing all new needs that come in before allowing them to be seen publicly on your site.
- If agencies will be posting requests for in-kind donations, encourage them to select the “in-kind” interest when posting the need. As the site manager, you can then create a second spotlight pointing specifically to in-kind donation requests.
To contact your agencies using the email blast, begin by running a filter on Volunteer > Agency Manager > is an Agency Manager.
Reach Out To Your Community
Let your volunteers know that, should they wish to help with disaster response, they can find needs on your site. Post the link to the disaster-response initiative on social media and on your main website to let everyone know. Send out a press release, and make sure the initiative link is included on other sites that list ways to help support the community during this time.
You can also send specific messages to those volunteers on your site who are particularly interested in disaster response.
Has your site been collecting profile data on whether volunteers would like to be notified in case of a disaster? If so, you can set up an email blast filter for only those volunteers who wish to be notified. To do this, run a filter on Disaster Response > Disaster notification > volunteers who wish to be notified.
Another option is to email only those volunteers who have indicated disaster response as one of their preferred causes; to do this, run the filter on User Data > User Causes > is > Disaster Response. (If you’ve overridden this default cause with another one, you won’t have this option.)
Later on, you use the user filter to reach out to all of the volunteers who responded to needs within this initiative.
Conclusion
Even if you don’t have the DRM, you can still use your Connect site for disaster-response needs. While initiatives wasn’t specifically designed for disaster response, this tool does offer a number of features that you can harness for that purpose. By setting aside an area of your site for disaster-response needs, customizing questions for disaster volunteers, and setting up a spotlight so that the needs are easy to find, you can help to make the process of gathering and managing volunteers a little easier.
If your community is facing a disaster and you have questions or need further guidance in managing disaster-response volunteerism on your Connect site, send our support team an email at support@galaxydigital.com, and include the words “disaster response” in the subject line. Your request will go to the top of our priority list, and you’ll hear back quickly from one of our Connect site experts.

![Feature Image for Staying Connected: Why Volunteer Programs Should Embrace Texting [+5 Effective Tactics]](https://www.galaxydigital.com/hs-fs/hubfs/Text%20Messaging%20Volunteers.jpg?width=352&name=Text%20Messaging%20Volunteers.jpg)